Reference
Using the Docking Station Function
This product is equipped with a LAN port and USB hub so that it can be used as a docking station. By connecting a USB-C cable, you can create a stable network environment even on notebook PCs or tablet devices that are not equipped with LAN ports. By connecting a USB-C cable or a USB 5Gbps cable, peripheral devices that support USB can be used, and smartphones can be charged.
If the external device has a USB-C connector
- Connect the USB-C cable.
- Check that the displayed input signal "USB Selection" is set to "USB-C" (see USB Selection - HDMI / DisplayPort / USB-C).
When using the USB-A connector of a PC
- Connect a USB 5Gbps cable (also connect an HDMI cable or DisplayPort cable for video signal display).
- Check that the displayed input signal "USB Selection" is set to "USB-B" (see USB Selection - HDMI / DisplayPort / USB-C).
Attention
- This function may not work depending on the external device you are using, your OS, and your peripheral devices. Contact the manufacturer of each device for information about USB compatibility.
- Even when the monitor is in power saving mode, devices connected to the USB downstream port are operational. Due to this, the power consumption of the monitor varies depending on the connected devices, even in power saving mode.
- When the main power switch of the monitor is off, the device connected to the USB downstream port will not operate.
- When Compatibility Mode is set to "Off" and the power of the monitor is turned off, a device connected to the USB downstream port will not operate.
Note
- The MAC address can be found on the back of the monitor. MAC address pass-through is not supported.
- This product supports USB 5Gbps. When the following conditions are met, high-speed data communication is possible.
- A peripheral device that supports USB 5Gbps is connected
- A USB cable that supports USB 5Gbps is used
- The device is connected to a USB connector that supports USB 5Gbps (blue connector)
- In the case of a USB-C connection, "Signal Format" – "USB-C" is set to "4K30Hz/USB3.1/YUV."
Connecting Multiple External Devices
This product can be connected to multiple external devices and allows you to switch between the connections for display.
Connection example
If two external devices are connected to a single monitor, then the input signals and USB ports can be linked, and the USB device connected to the monitor can be switched using two external devices. For details, see USB Selection - HDMI / DisplayPort / USB-C.
Note
- You can select the input signal to display using the operation switch (
 ) on the front of the monitor. For details, see Switching Input Signals.
 - This product provides a function that automatically recognizes the connector through which signals are input, and displays images on the screen accordingly. For details, see Auto Input Detection.
Setting and Display Method of PQ Option
This section describes the setting of "PQ Option" and the relation between the input signal (10 bits: 0 to 1023) and the brightness displayed on the monitor.
Note
- This relation assumes that the input signal is full range (and that "Input Range" in "Signal" is set to "Full").
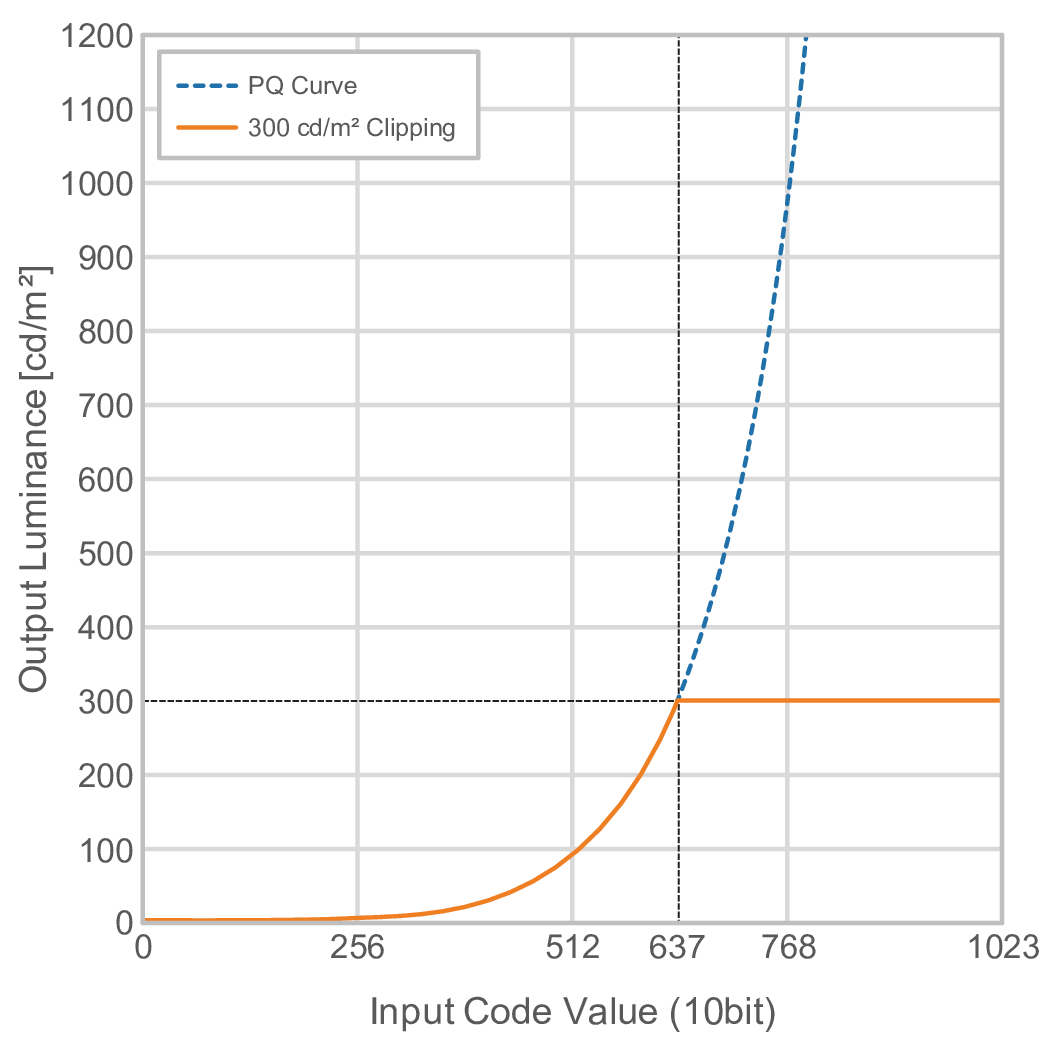
For "300cd/㎡ Clipping"
- Set the brightness to the specified value to display properly.
- Example: When "PQ Option" is set to "300cd/㎡ Clipping", set the monitor brightness to 300 cd/m2.
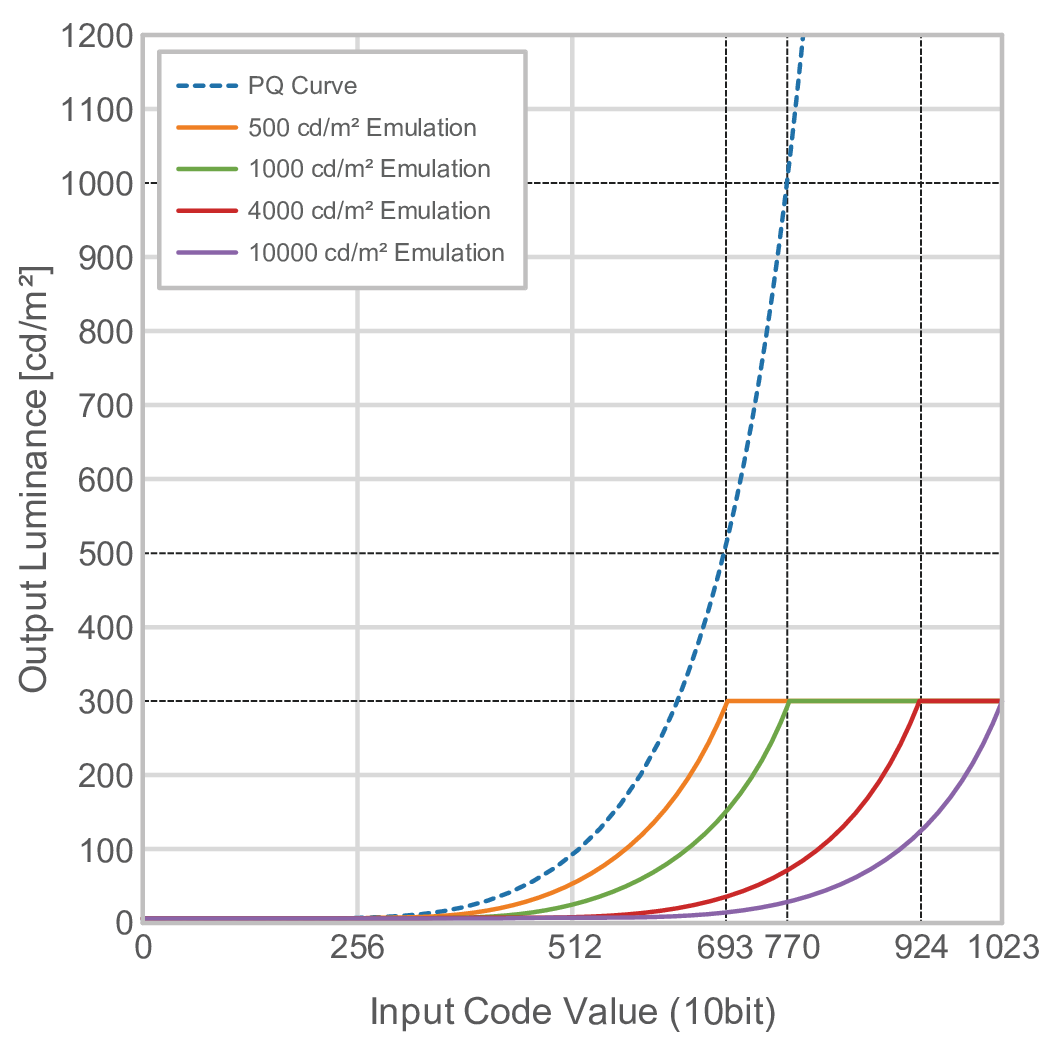
For "500cd/㎡ Emulation", "1000cd/㎡ Emulation", "4000cd/㎡ Emulation", "10000cd/㎡ Emulation" (Monitor brightness setting: 300cd/㎡)
- This setting is used for temporary checks.
- Example: When "PQ Option" is set to "4000cd/㎡ Emulation", the representation of gradation is equivalent to that of the monitor with the maximum brightness of 4000 cd/m2. In this case, the representation of gradation is decreased according to the brightness setting of this monitor because it has the maximum brightness of 4000 cd/m2 or less.