Introduction
This chapter describes the features of the monitor and the name of each control. See the Setup Guide for information on the accessories included with this product.
Features
Large built-in high resolution 4K LCD that is advantageous for video production
- 30.5-inch widescreen monitor with support for DCI 4K resolution (4096 x 2160)
- Supports the digital cinema standard for DCI 4K resolution of 4096 x 2160. In addition to 4K videos, which have a high resolution that is more than 4x greater than full HD, multiple full HD videos can be displayed at the same time.
- Faithful reproduction of video colors with a wide color gamut display
- 99% of DCI is covered, for a highly accurate color management environment.
- Built-in IPS LCD panel with 178° horizontal and vertical wide viewing angles
Support for HDR (High Dynamic Range) video
- Complies with the international HDR standards for movies and broadcasts
- Supports both the HDR "PQ format" for streaming and movie production, and the HDR "Hybrid Log Gamma format" for broadcasts. The "PQ format" complies with the SMPTE ST.2084*1 international HDR standards, and the "Hybrid Log Gamma format" complies with the ITU-R BT.2100*2 international HDR standard. This makes it possible to use the monitor for the color grading of a wide range of HDR content, such as movies and broadcasts.
- SMPTE stands for the Society of Motion Picture and Television Engineers.
- ITU-R stands for the International Telecommunication Union-Radio communication Sector.
- Built-in color mode function
- Reproduces a color temperature, gamma, and color gamut compliant with ITU-R BT.2100 and other standards.
- (see Color Mode)
Built-in mode for automatically switching to the optimal color settings
- Color Mode "SYNC_SIGNAL"
- This monitor is equipped with a color mode (SYNC_SIGNAL) so you can automatically set the optimal values for the color settings of the monitor according to the input signal. If you use this mode, the color settings of the monitor automatically switch to the optimal color settings for HDR when the input signal is switched from SDR to HDR, so setting the colors manually is not necessary.
Various functions that support color grading work
- Dedicated video production functions, such as a Gamut Warning function and a Luminance Warning function
- (see Advanced Adjustments/Settings)
- 4K Zoom function
- When a 4K2K signal (a signal with a resolution of 4096 x 2160 or 3840 x 2160) is displayed on the monitor, the specified area can be doubled in size. This is convenient for checking details in an image.
- (see Zoom)
- User-defined custom key function
- Work efficiency can be improved by assigning frequently used functions to the buttons on the front of the monitor.
- (see Custom Key Settings)
- Displays HDCP (High Bandwidth Digital Protection) protected content
- Monitor hood included as standard
- Includes a monitor hood that effectively prevents reflections from external light, such as the reflected glare of a light. The monitor hood uses magnets for easy attachment and removal.
- SelfCalibration function
- The built-in calibration sensor enables the monitor to calibrate itself by using SelfCalibration.
- (see SelfCalibration)
Supports video display and power supply with a single USB Type-C® (hereinafter "USB-C®") cable connection
- Equipped with a USB-C connector
- Supports the transmission of video signals (DisplayPort™ Alt Mode) as well as power supply (USB Power Delivery).
- It can supply up to 94 W of power to a connected laptop when used as an external monitor.
Note
- To display video signals, the connected device must support transmission of video signals (DisplayPort Alt Mode).
- To use the charging function, the connected device must support device charging by using USB Power Delivery.
- Power delivery of up to 94 W is possible only when using the following USB cables:
- CC200SS-5A
- CC100
- Connected devices can be charged even when the monitor is in power saving mode.
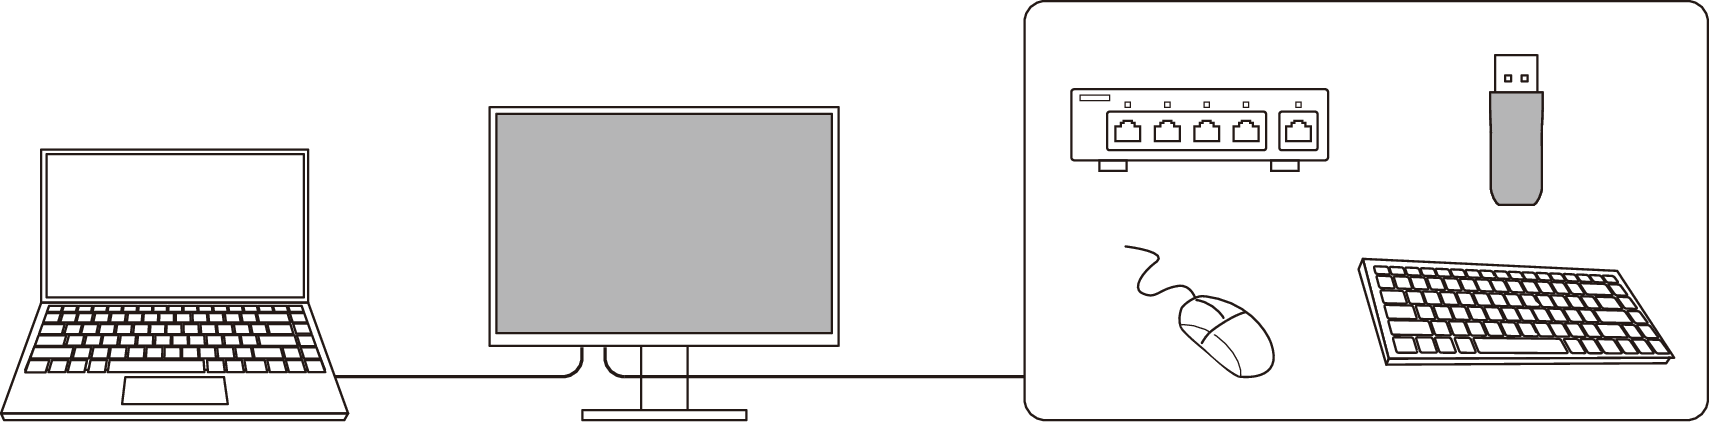
Includes Docking Station Function
- Includes LAN port and USB hub
- Connecting via USB-C allows you to use a stable network environment even with laptops or tablets that lack LAN ports. In addition, peripheral devices that support USB can be used, and smartphones can be charged.
- (see Using the Docking Station Function)
Controls and Functions
Front
| This sensor is used to perform monitor calibration. When SelfCalibration is executed, the calibration sensor automatically operates and regularly calibrates the monitor (see SelfCalibration). |
| Displays menus. Operate the switches according to the operation guide (see Basic Operation of the Setting Menu). |
| Turns the power on or off. Touching the switch turns on the power. The switch indicator lights up when you turn the power on. The indicator color differs depending on the monitor's operation status. White: Normal operation mode Orange: Power saving mode OFF: Main power/power off |
Rear
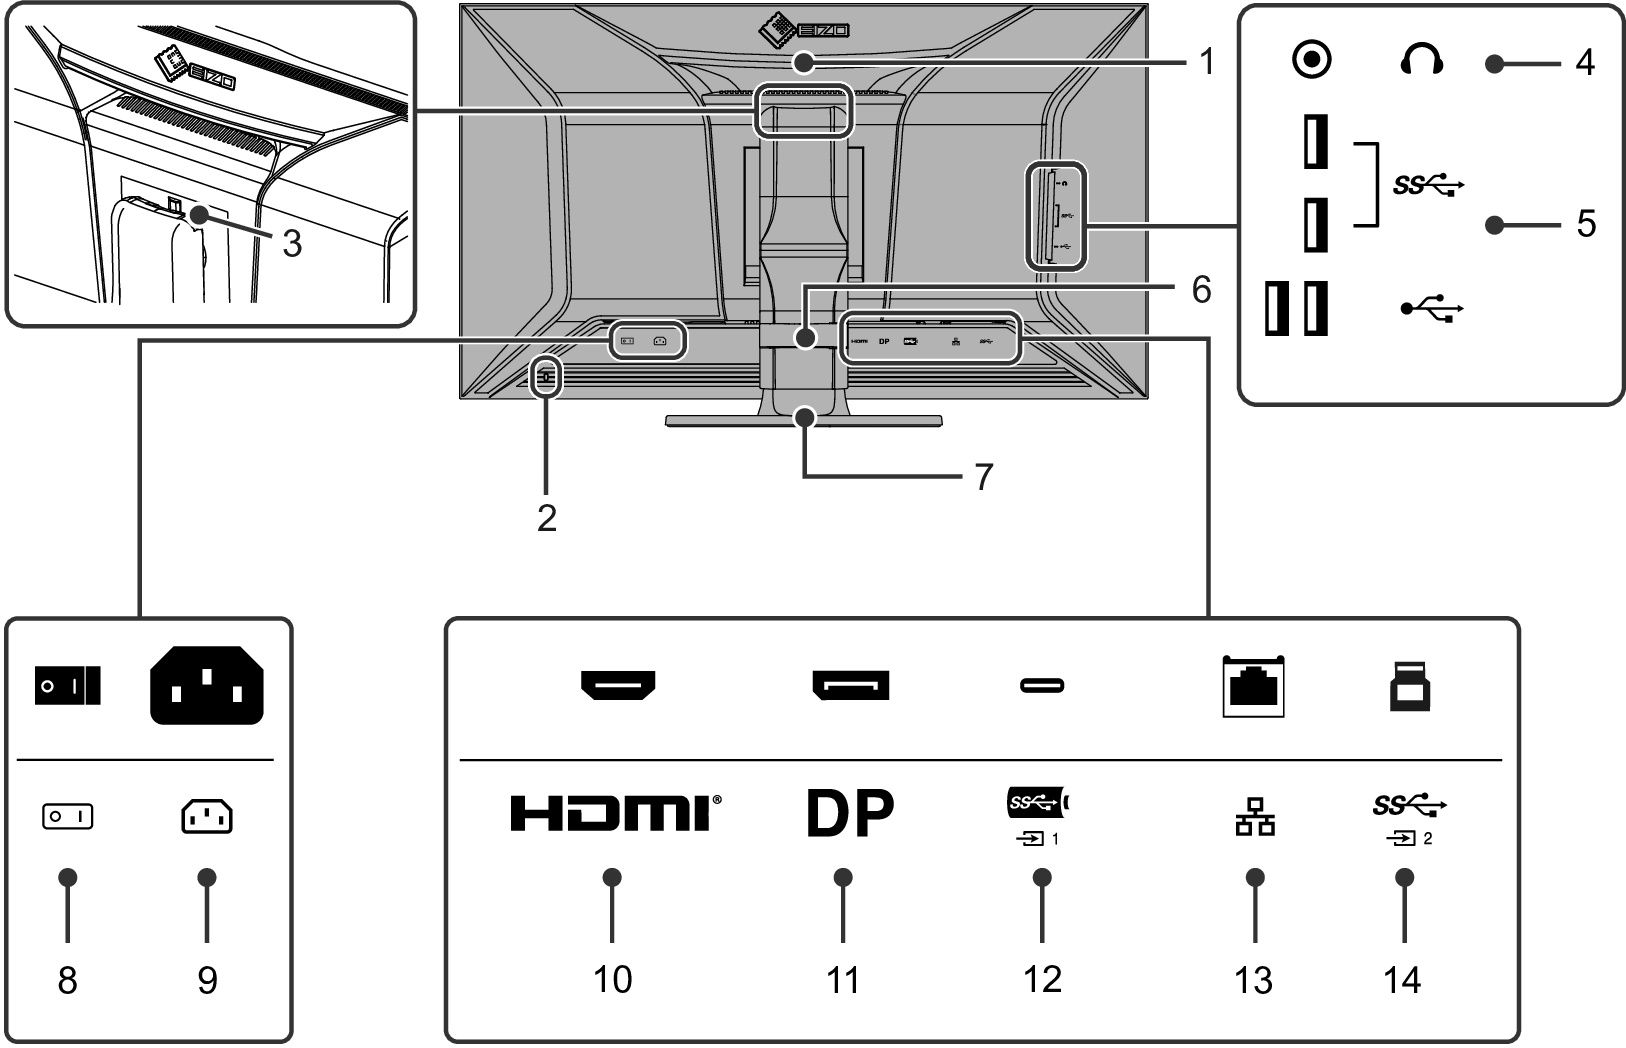
| This handle is used for transportation. |
| Complies with Kensington's MicroSaver security system. |
| Use this button to remove the monitor from the stand. |
| Connects to headphones. |
| Connects to a peripheral USB device (see Using the Docking Station Function).
|
| Holds the monitor cables. |
| Adjusts the height and angle (tilt and swivel) of the monitor. |
| Turns the main power on or off.
|
| Connects the power cord. |
| Connects to an external device with HDMI signal output. |
| Connects to an external device with DisplayPort signal output. |
| Connects to an external device with USB-C signal output. This also transmits the USB signal that is necessary for using software that requires a USB connection or the docking station function (see Using the Docking Station Function). |
| When using the network connection of the Docking Station Function, connect the modem or router using a LAN cable. A USB-C connection is required to establish a network connection (see Using the Docking Station Function). |
| Connect using USB cable when using software that requires a USB connection. The blue connector. |
 : USB 5Gbps (blue connector)
 : USB 2.0
 : On,
: On,  : Off
: Off- A separate stand (or monitor arm) can be attached to this product by removing the stand.