Basic Adjustment/Setting
This product enables users to change the brightness according to personal preference or to suit the usage environment, and to reduce power consumption to conserve energy.
This chapter describes the basic functions that can be adjusted and set using the switches on the front of the monitor.
For advanced adjustment and setting procedures using the Setting menu, see Advanced Adjustments/Settings.
Switch Operation Method
- Touch any switch (except
 ).
). - The operation guide appears on the screen.

Note
- Do not directly touch the operation guide that appears on the screen. There are switches below the operation guide that can be touched to perform adjustment/setting.
- Touch a switch for adjustment/setting.
- The adjustment/setting menu appears.
(A sub menu may also be displayed. In this case, select the item for adjustment/setting using
 and select
  .)
.) - Perform adjustment/setting with the switches and select to accept the changes.
- Select
 to exit the menu.
Switching Input Signals
When a monitor has multiple signal inputs, the signal to display on-screen can be changed.
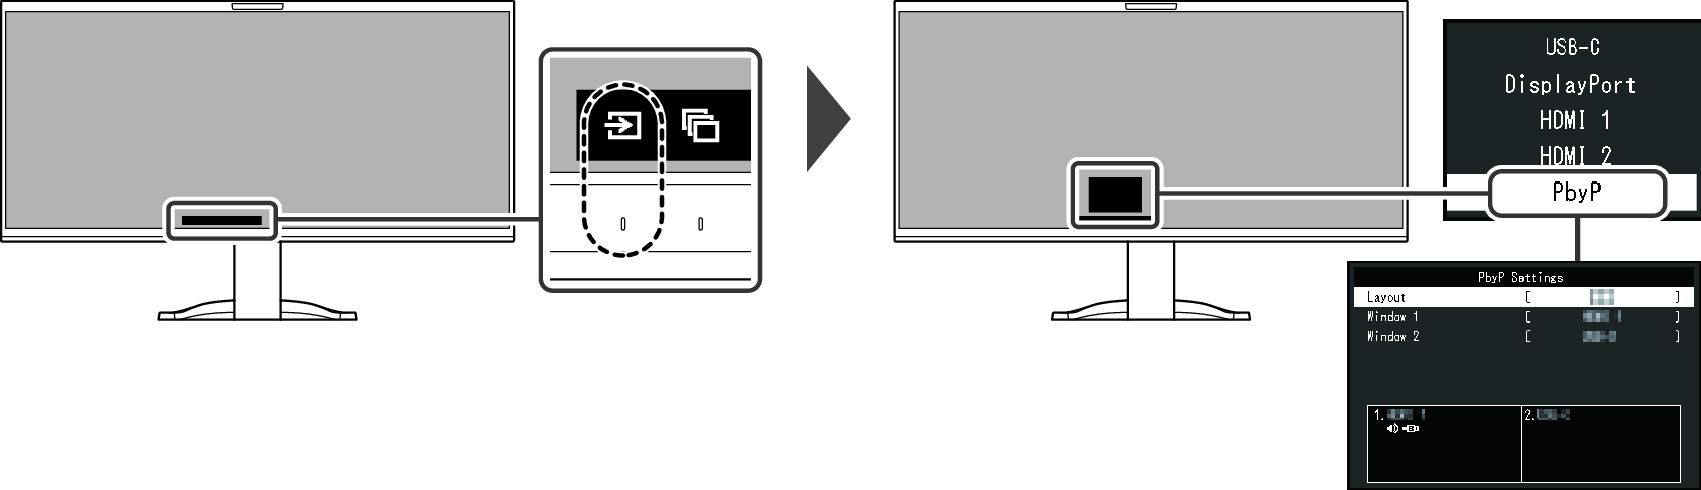
To switch to "PbyP", select "PbyP" and then .
For information on PbyP, see Using PbyP Display.
Note
- "Screen InStyle" allows you to switch input signals using the keyboard hotkeys.
Switching Display Modes (Color Modes)
This product is preinstalled with color modes for various display purposes.
By switching the color mode according to the purpose and contents of the display, you can display images in an appropriate manner.

Color Modes
Color mode | Purpose |
|---|---|
User1 | Select either of these modes to set a user-defined display mode. |
User2 | Select either of these modes to set a user-defined display mode. |
sRGB | This mode is suitable for matching color reproduction with peripheral devices that support sRGB, such as when printing photos taken using a digital camera. |
Paper | This mode uses color tones and contrast similar to that of paper to produce a printed paper effect. It is suitable for displaying images from media such as books and documents. |
Movie | This mode displays moving images brightly and with a clear-cut three-dimensional appearance. It is suitable for playing back video content. |
DICOM | Select this mode to simply display digital imaging for medical based on DICOM® Part 14. "EcoView Settings" and "Color" become invalid, and cannot be adjusted or set.
|
Note
- If a power consumption warning message appears, select "OK" to proceed to the next operation (see The message "Changes to this setting may increase power consumption." appears on the screen).
- "Screen InStyle" allows you to select the color mode automatically according to the software in use.
- In Paper mode, the amount of blue light emitted from the screen is reduced by changing the color tone and controlling the brightness.
Conserving Energy
This monitor is equipped with EcoView functions to enable users to conserve energy.
If you use Auto EcoView, which is one of the EcoView functions, the screen brightness is automatically adjusted according to the ambient brightness.

Note
- The power saving level (Power Reduction, CO2 Reduction, and Eco Performance Level) can be checked on the "EcoView Settings" menu. The more indicators that light up representing the Eco Performance Level, the higher the power saving level attained.
- Power Reduction: the reduction in the backlight’s power consumption as a result of the adjusted brightness value.
- CO2 Reduction: converted from the "Power Reduction" value, this is an estimate of the quantity of CO2 emissions reduced when using the monitor for one hour.
- The figures are calculated based on the Emission factors by electric power company (FY2021 results, published in 2023) - TEPCO Energy Partner "Menu J (residual)" published by the Ministry of the Environment of Japan.
Auto EcoView
Settings: "On" / "Off"
The ambient light sensor on the front of the monitor detects the ambient brightness to automatically adjust the screen brightness to a comfortable level using Auto EcoView.
The power consumption of the backlight can be curtailed by adjusting the brightness to an appropriate level.
This function can also mitigate eye strain and tiredness caused by a screen that is too bright or too dark.
Note
- If a power consumption warning message appears, select "OK" to proceed to the next operation (see The message "Changes to this setting may increase power consumption." appears on the screen).
- Be careful not to block the ambient light sensor on the lower side of the monitor when using Auto EcoView.
- Even when Auto EcoView is set to "On", you can change the brightness of the monitor using the operation switches (
 ) on the front of the monitor or in the color adjustment settings. The manner in which Auto EcoView changes the brightness will also vary depending on the value you set.
 - When "DICOM" is selected for the color mode, the Auto EcoView setting is turned "Off".
EcoView Optimizer 2
Settings: "On" / "Off"
The monitor automatically adjusts the screen brightness according to the white level of the input signal.
This function can reduce power consumption while maintaining the brightness specified by the input signal.
Note
- If a power consumption warning message appears, select "OK" to proceed to the next operation (see The message "Changes to this setting may increase power consumption." appears on the screen).
- The EcoView Optimizer 2 setting becomes "Off" in the following cases:
- When "Movie" or "DICOM" is selected for the color mode
- When set to "On", the appearance of pale colors may change. If this bothers you, set this function to "Off".
Adjusting the Brightness
Settings: "0" to "100"
The brightness of the screen can be adjusted to suit the installation environment or personal preference.
The screen brightness is adjusted by changing the brightness of the backlight (light source from the LCD back panel).
Note
- If a power consumption warning message appears, select "OK" to proceed to the next operation (see The message "Changes to this setting may increase power consumption." appears on the screen).
Adjusting Volume
Settings: "0" to "30"
The volume of the speakers and headphones can be set individually.