Advanced Adjustments/Settings
This chapter describes the advanced monitor adjustment and setting procedures using the Setting menu.
For basic functions, see Basic Adjustment/Setting.
Basic Operation of the Setting Menu
- Touch any switch (except
 ).
). - The operation guide appears.
- Select
 .
. - The Setting menu appears.
- Select a menu to adjust/set with

 and select
  .
. - The Sub menu appears.
- Select a menu to adjust/set with and select .
- The adjustment/setting menu appears.
- Perform adjustment/setting with or

 and select to accept the changes.
 - The Sub menu appears.
Selecting during adjustment/setting will cancel the adjustment/setting and restore the state prior to making changes.
 - Selecting several times will terminate the Setting menu.
Setting Menu Functions
Color
The color mode settings can be adjusted according to personal preference. The adjusted settings are saved for each color mode.
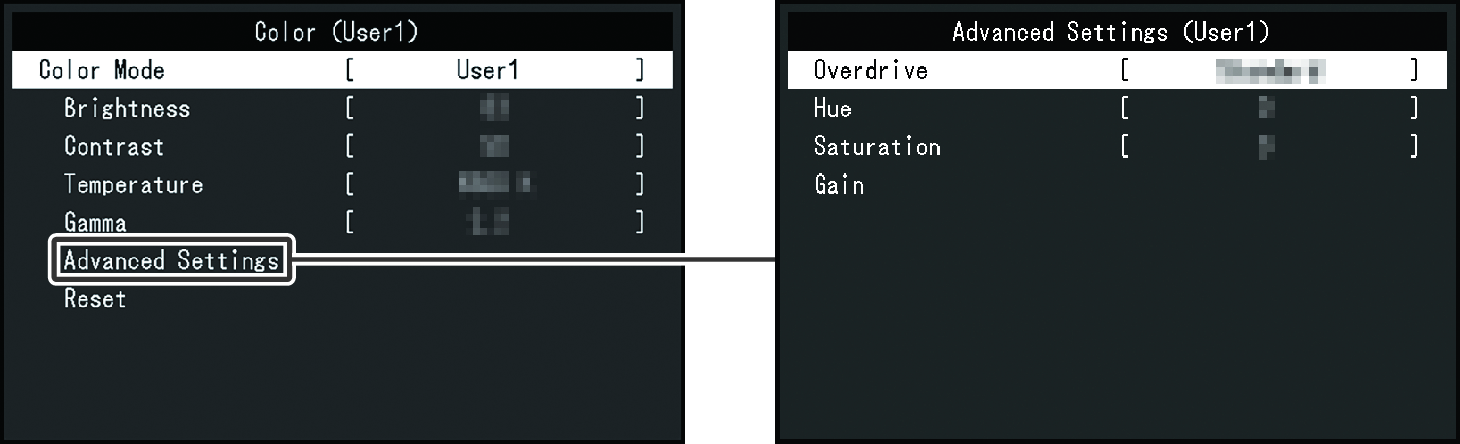
Functions that can be adjusted differ depending on the color mode.
✓: Adjustable, -: Not adjustable
Function | Color Mode | ||||||
|---|---|---|---|---|---|---|---|
User1 | User2 | sRGB | Paper | Movie | DICOM | ||
Brightness | ✓ | ✓ | ✓ | ✓ | ✓ | - | |
Contrast | ✓ | ✓ | - | - | ✓ | - | |
Temperature | ✓ | ✓ | - | ✓ | ✓ | - | |
Gamma | ✓ | ✓ | - | - | - | - | |
Advanced Settings | Overdrive | ✓ | ✓ | - | - | - | - |
Hue | ✓ | ✓ | - | - | ✓ | - | |
Saturation | ✓ | ✓ | - | - | ✓ | - | |
Gain | ✓ | ✓ | - | - | - | - | |
Reset | ✓ | ✓ | ✓ | ✓ | ✓ | - | |
Attention
- It takes about 30 minutes for the monitor display to stabilize. Please wait 30 minutes or more after power to the monitor has been turned on before adjusting the monitor.
- The same image may be observed in different colors on multiple monitors due to monitor-specific characteristics. Make fine color adjustments visually when matching colors across multiple monitors. Follow the procedure below to adjust and match colors across multiple monitors.
- Display a white screen on each monitor.
- Use one of the monitors as a visual reference point to make adjustments to "Brightness", "Temperature", and "Gain" on the other monitors.
- When Auto EcoView is set to "On", the same brightness setting is shared by all of the color modes and cannot be set individually for each color mode.
Color Mode
Settings: "User1" / "User2" / "sRGB" / "Paper" / "Movie" / "DICOM"
Select the desired mode according to the monitor application.
The color mode settings can also be adjusted according to personal preference. Select the color mode for adjustment and perform adjustment using the relevant functions.
Note
- For details on the adjustment status of each color mode, see Switching Display Modes (Color Modes).
Brightness
Settings: "0" – "100"
The screen brightness is adjusted by changing the brightness of the backlight (light source from the LCD back panel).
Note
- If the image is too dark even when the brightness is set to 100, adjust the contrast.
Contrast
Settings: "0" – "100"
You can adjust the brightness of the screen by varying the video signal level.
Note
- When the contrast is set to 50, all color gradations will be displayed.
- When adjusting the monitor, it is recommended to perform brightness adjustment, which does not lose gradation characteristics, prior to contrast adjustment.
- Perform contrast adjustment in the following cases:
- If the image is too dark even when the brightness is set to 100 (Set the contrast to higher than 50.)
Temperature
Settings: "Off" / "4000 K" – "10000 K" (in increments of 500 K. 9300 K is included.)
Adjusts the color temperature.
The color temperature is normally used to express the hue of "White" and/or "Black" with a numerical value. The value is expressed in degrees "K" (Kelvin).
The screen becomes reddish at low color temperatures and bluish at high color temperatures, similar to the temperatures of a flame. A gain preset value is set for each color temperature setting value.
Note
- The value shown in "K" is available only as a reference.
- "Gain" allows you to perform more advanced adjustment.
- If set to "Off", the image is displayed in the preset color of the LCD panel (Gain: 100 for each RGB channel).
- When the gain is changed, the color temperature setting changes to "Off".
Gamma
Settings: "1.8" / "2.0" / "2.2" / "2.4"
Adjusts the gamma.
While the brightness of the monitor varies depending on the video level of the input signal, the variation rate is not directly proportional to the input signal. Maintaining the balance between the input signal and brightness of the monitor is referred to as "Gamma correction".
Note
- If "sRGB" is selected for the color mode, "sRGB" is displayed for the gamma value.
- If "Paper" is selected for the color mode, "Paper" is displayed for the gamma value.
- If "DICOM" is selected for the color mode, "DICOM" is displayed for the gamma value.
Advanced Settings - Overdrive
Settings: "Enhanced" / "Standard" / "Off"
This function allows you to set the overdrive intensity based on the use of the monitor.
Note
- Depending on the display resolution and the setting of "Picture Expansion," overdrive may be set to "Off."
Advanced Settings - Hue
Settings: "-50" – "50"
Adjusts the hue.
Note
- Using this function may prevent some color gradations from being able to be displayed.
Advanced Settings - Saturation
Settings: "-50" – "50"
Adjusts the color saturation.
Note
- Using this function may prevent some color gradations from being able to be displayed.
- The minimum value (-50) changes the screen to monochrome.
Advanced Settings - Gain
Settings: "0" – "100"
The brightness of each red, green, and blue color component is referred to as "Gain". The hue of "white" can be changed by adjusting the gain.
Note
- Using this function may prevent some color gradations from being able to be displayed.
- The gain value changes according to the color temperature.
- When the gain is changed, the color temperature setting changes to "Off".
Reset
Resets any color adjustments for the currently selected color mode back to the default settings.
Signal
Set the details regarding input signal, such as the screen size and color format.
Target
Settings: "USB-C" / "DisplayPort" / "HDMI 1" / "HDMI 2"
Select the input signal of the screen to apply "Signal" to when using PbyP display.
Please perform this selection when starting usage of PbyP display.
Note
- This can only be set when using PbyP display.
- For information on PbyP, see Using PbyP Display.
Picture Expansion
Settings: "Auto*1" / "Full Screen" / "Aspect Ratio" / "Dot by Dot"
- Only available during HDMI signal input
The screen size of the monitor display can be changed.
- "Auto"
- The monitor automatically changes the screen size according to the aspect ratio and resolution information from the PC.
- "Full Screen"
- Displays images in full screen. Since aspect ratios are not maintained, images may be distorted in some cases.
- "Aspect Ratio"
- Displays images in full screen. Since aspect ratios are maintained, blank horizontal or vertical borders may appear.
- "Dot by Dot"
- Displays images at the set resolution or size specified by the input signal.
Note
- Setting example
- In the case of PbyP display, the setting is fixed to "Auto" for the HDMI signal and "Aspect Ratio" for the other signals.
Sharpness
Settings: "0" to "2"
When a low-resolution image is displayed using picture expansion mode ("Full Screen" or "Aspect Ratio"), the text and lines of the image may appear blurry. This blurriness can be reduced by configuring the settings for sharpness.
Input Color Format
Settings: "Auto" / "YUV 4:2:2*1" / "YUV 4:4:4*1" / "YUV*2" / "RGB"
The color format of the input signal can be specified.
Try changing this setting if colors are not displayed correctly.
- Only available during HDMI signal input
- Only valid for DisplayPort or USB-C signal input
Input Range
Settings: "Auto" / "Full" / "Limited"
Depending on the video reproduction device, there may be a restriction on black and white video signal levels output to the monitor. This kind of signal is called "Limited range". On the other hand, unlimited signals are called "Full range".
- "Auto"
- Input signal brightness range is automatically judged and is displayed appropriately (recommended setting). Depending on the video reproduction device, Limited range and Full range may not be able to be judged by the monitor. In such a case, selecting "Full" or "Limited" will allow it to be displayed appropriately.
- "Full"
- To be selected in case of Full range signals. Appropriate display can be obtained when this is selected, in case both blacks and whites are corrupted.
- "Limited"
- To be selected in case of Limited range signals. In case this is selected, the output signal range is expanded from 0 to 255 to obtain an appropriate display when black is pale and white is dull.
Note
- When "YUV" is selected in "Input Color Format", the setting is automatically set to "Limited". Additionally, when "Auto" is selected and the monitor determines the input color format to be YUV, the setting is automatically set to "Limited".
Preferences
The monitor settings can be configured to suit your usage environment or preferences.

Power Save
Settings: "On" / "Off"
The monitor can be set to enter power saving mode according to the state of the PC.
The monitor changes to power saving mode about 15 seconds after signal input ceases to be detected.
When the monitor has shifted to power saving mode, images are not displayed on the screen and audio is not output.
- How to exit power saving mode
- Press the operation switches (excluding ) on the front of the monitor
- The monitor automatically exits power saving mode when the monitor receives input
Note
- At the time of shifting to power saving mode, a message that indicates the transition is displayed five seconds in advance.
- When using PbyP display, the monitor will revert to power saving mode only when both computers are in power saving mode.
- When not using the monitor, you can turn off the main power supply or disconnect the power plug so that the power is cut completely.
- When Compatibility Mode is set to "On", even if the monitor shifts to power saving mode, devices connected to the USB downstream port are operational. Therefore, power consumption of the monitor varies with connected devices even in power saving mode.
Indicator
Settings: "Off" / "1" – "7"
The brightness of the power lamp can be set in normal operation mode or power saving mode.
Note
- Even when the setting is "Off", the brightness will turn on at "1" in the following cases.
- The EIZO logo and certification standard logo is displayed on the screen
- The "No Signal" message is displayed on the screen
- Power saving mode
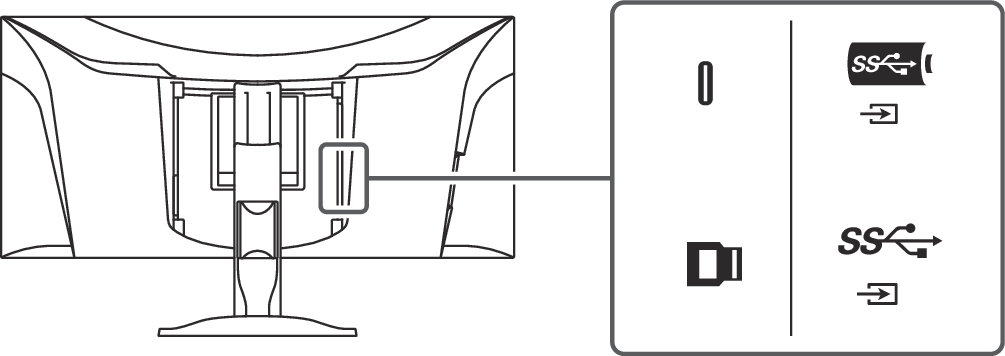
USB Selection - DisplayPort / HDMI 1 / HDMI 2
Settings: "USB-C" / "USB-B" / "No Assign"
When two PCs are connected to one monitor, you can link the input signal with the USB upstream port. (Connection Example: Share USB Devices Between Two PCs)
The compatibility of setting values and USB connectors is as follows.
"USB-C": USB-C connector (upstream) 
"USB-B": USB-B connector (upstream) 
Note
- Before changing the setting, remove all connected USB memory devices from the monitor. Otherwise, data may be lost or damaged.
Speaker (Firmware version 10004-10004-10004 or later only)
Settings: "On" / "Off"
The audio output of the speakers and headphones can be switched between "On" and "Off."
Mic (Firmware version 10004-10004-10004 or later only)
Settings: "On" / "Off"
The microphone can be switched between "On" and "Off."
Note
- Before changing the setting, remove all connected USB memory devices from the monitor. Otherwise, data may be lost or damaged.
Camera (Firmware version 10004-10004-10004 or later only)
Settings: "On" / "Off"
The camera can be switched between "On" and "Off."
Note
- Before changing the setting, remove all connected USB memory devices from the monitor. Otherwise, data may be lost or damaged.
Monitor Reset
Restores all settings to their default settings except for the following settings:
- PbyP display settings
- Settings on the "Administrator Settings" menu
- "USB Selection" / "Speaker" / "Mic" / "Camera" settings on the "Preferences" menu
Languages
Settings: "English" / "German" / "French" / "Spanish" / "Italian" / "Swedish" / "Japanese" / "Simplified Chinese" / "Traditional Chinese"
The display language for menus and messages can be changed.
Attention
- The display language of the "Administrator Settings" menu (English) cannot be changed.
Information
You can check the monitor information (model name, serial number (S/N), firmware version, usage time) and the input signal information.
Example:
When is selected, the certification standard logo appears on the screen.