Abnormal image displayed in 6-bits when connecting to DisplayPort of particular graphics boards
Appendix 2
How to Set the Backlight Saver Function
Preparation
- Install RadiCS or RadiCS LE on your computer.
- Connect the monitor to the computer with a USB cable.
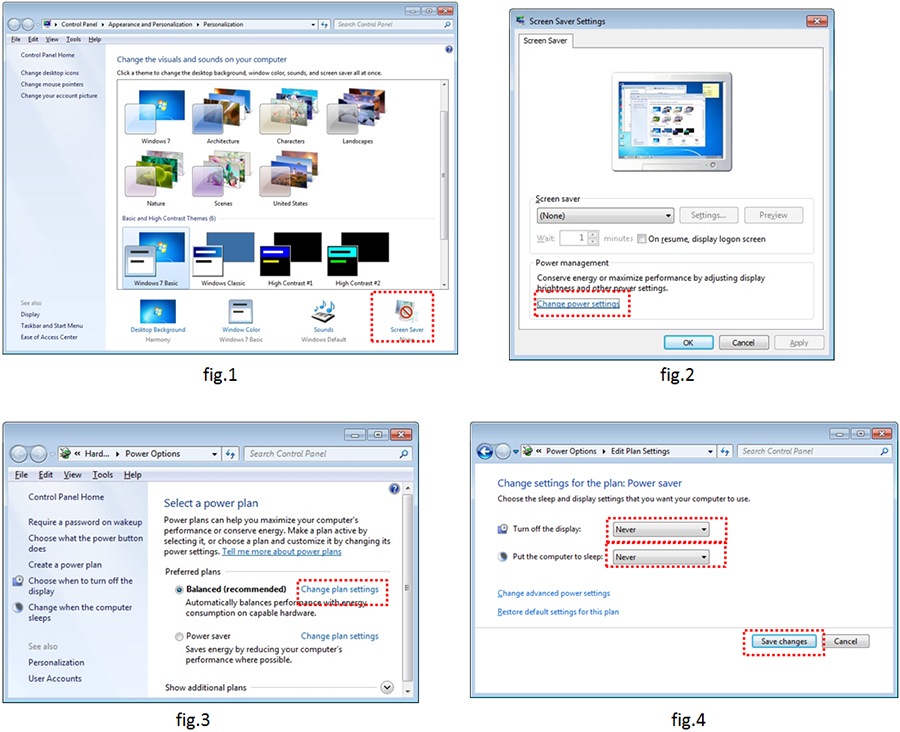
Computer Settings (for Windows 7)
- Click the right mouse button on your computer desktop.
- Go to [Personalize] and click [Screen Saver] at the bottom-right of the window. (fig.1)
- Click [Change power settings] at the bottom-left of the Screen Saver Settings window. (fig.2)
- Click [Change plan settings] next to “Balanced” or “Power saver”, whichever is selected. (fig.3)
- Change both settings to “Never” and click [Save changes]. (fig.4)
Monitor Settings
How to Disable DP Power Save Mode
For RadiForce RX440 and GX540
1. Press the secondary power button to turn off the monitor.
2. Hold down [MODE] while pressing the secondary power button for at least two seconds to turn on the monitor. The “Optional Settings” menu appears.
3. Select [Connection Config].
4. Set [DP Power Save] to [Off] and press [ENTER].
5. Press [RETURN] to exit.
6. Select [Finish] and press [ENTER].
How to Disable DP Power Save Mode
For RadiForce RX650 and RX850
Connect the monitor to your computer with a USB cable. (USB connection disables DP Power Save mode.)
RadiCS/RadiCS LE Settings (please also refer to the user’s manual for details)
Start the software
1. Click [Start] and go to [All programs] - [EIZO]- [RadiCS/RadiCS LE]. If you are using RadiCS, please start [Advanced mode].
Monitor Detection (Automatically runs when starting the software for the first time.)
2. Select how a circle is shown on the monitor(s).
3. Select a monitor and register the monitor’s information. (If you are using more than one monitor, proceed in the same order on the other monitors.)
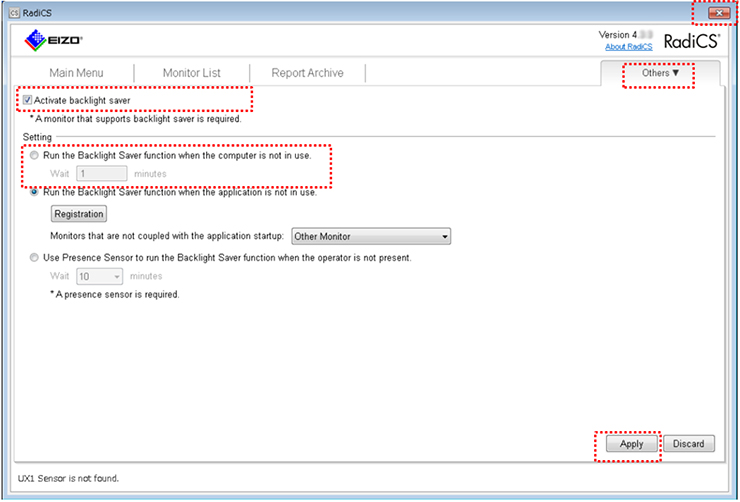
Backlight Saver settings
4. Click [Others] tab and select [Backlight Saver] from the list.
5. Check “Activate backlight saver”.
6. Select [Run the Backlight Saver function when the computer is not in use], input your waiting time and click [Apply].
7. Click [x] button to finish settings.