Monitor Basics in Plain English
Using the convenient "multi-display" function on Windows 10
- Security
- ATC Resources
- Monitor Basics in Plain English
- Expert Advice – The Best Way to Invest in Your Home Office
- FlexScan EV2795: A Writer’s Extensive Review
- Efficient Telecommuting with a Laptop and Monitor
- What is the Optimal Display for Watching Video? – The OLED Revolution
- Integrated R&D, QC, and Production
- Adding a Touch of White
- HiDPI
- What We Discovered After Trying Five EIZO Monitors in our Editorial Department
- Poor Work Efficiency
- Improve Work Efficiency by Combining an External Monitor with your Notebook PC
- EIZO Monitor Test
- Windows 10 Creators Update
- What is USB Type-C?
- Modern Video Inputs
- Windows 10 Multi-Display Function
- EIZO and Mac – The Perfect Match
- Implementing 4K Monitors
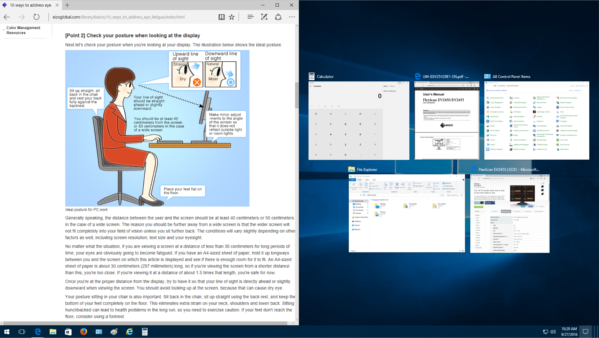
- 10 ways to address eye fatigue caused by displays
- EIZO 4K Monitors – high definition and large screen sizes
- Confused about HiDPI and Retina display? ― Understanding pixel density in the age of 4K
- EIZO Optical Bonding
- How to Address Computer-Related Eye Fatigue
- Pixel Pitch and Enlarged Mode
- Native Resolution and Enlarge Mode
- How can a screen sense touch? A basic understanding of touch panels
- Is the beauty of a curve decisive for color reproduction? Learning about LCD monitor gamma
- Smoother Video with Cutting-Edge Technologies: LCD Monitor I/P Conversion
- Altering color dramatically with a single setting: Examining color temperature on an LCD monitor
- Maximum Display Colors and Look-Up Tables: Two Considerations When Choosing a Monitor
- DisplayPort to D-Sub: The Full Range of LCD Monitor Video Input Interfaces
- The Ability to Display Color Correctly Is Vital: Understanding the Color Gamut of an LCD Monitor
- The Making of a FlexScan Monitor
- Are the response time figures true? A close look at LCD video performance
- The difference in image quality is perfectly obvious! – Let's check the LCD's display
- Making Full Use of the "External" LCD with Laptop Computers
- Videos
- Color Management Resources
- Healthcare Resources
Windows 10 has become even more user-friendly for notebook and desktop PC users.
With the revival of the “Start Menu” from Windows 8 to Windows 10, this user-friendly desktop UI (user interface) realizes a more operable multi-display function. Let’s take a look at how we can use this multi-display tool on a Windows 10 notebook or desktop PC.
This is a translation from Japanese of an article published by ITmedia on March 18, 2016. Copyright 2016 ITmedia Inc. All Rights Reserved.
Click here for the Windows 7 method
Click here to see Windows 10 Creators Update changes
The new OS “Windows 10” has a focus on PC usability
On July 29 2015, Windows released their new operating system “Windows 10.” Devices equipped with Windows 7 or Windows 8.1 were given one year to upgrade to Windows 10 for free, and so the migration to the new OS (operating system) Windows 10 is happening much faster than previous Windows operating systems. Even corporate users who emphasize stability over innovation, will proceed to slowly migrate towards Windows 10 when Windows 7 support ends in 2020.
When using Windows 10 in your notebook PC or desktop computer you’ll notice one major change – the revival of the desktop UI. This UI was revived after the complete removal of the Start Menu in Windows 8/8.1 - previously present in Windows 7 and earlier - was met with mixed reactions. The latest UI has become much easier to use, with the modern UI “tile format” being integrated with a virtual desktop feature in order to enhance multitasking and workability.
With the new focus on the desktop UI, Windows 10 has naturally improved the display settings. For example the “multi-display” function (Multiple displays connected to one’s PC for simultaneous use) has been greatly improved. Let’s go through some of these surprisingly not well known Windows 10 multi-display functions found on both notebook PCs and Desktop PCs.
 |
| Example: EIZO LCD display FlexScan EV2455 connected to 13.3" 2in1 notebook PC (VAIO Z). Projecting the 13.3" notebook PC display to a 24.1" WUXGA (1920 x 1200 pixels) external display greatly enhances one’s work efficiency. |
 |
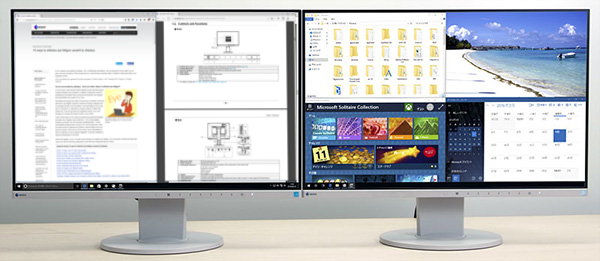
| Example: The expanded display of two EIZO FlexScan EV2455 monitors connected to a desktop PC. Aligning two 24.1" WUXGA (1920 x 1200 pixels) monitors side by side achieves a combined resolution of 3840 x 1200 pixels. |
Understanding the display settings for Windows 10
Setting up a multi-display environment on Windows 10 is incredibly simple. When you connect a second display to your PC, Windows automatically detects the display and displays the desktop UI.
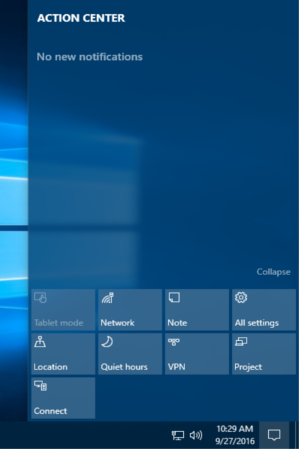
In this case we opened the multi-display function from the desktop UI by selecting the OS “Project” menu. From the taskbar, click on the Action Center (bottom right of screen) and select “Project,” or if you want to use the shortcut keys, press the Windows Key and P key and the “Project” menu will appear. There are four types of display methods that can be chosen. If you want to expand the desktop UI over two screens, select the “Extend” option.
- PC screen only: used only to view the original display unit – the additional unit will be blank
- Duplicate: used to display the same image on both displays
- Extend: used to extend the desktop UI across the two displays; making your computer screen ‘longer.’
- Second screen only: used only to display the additional display unit – the original will become blank
 |
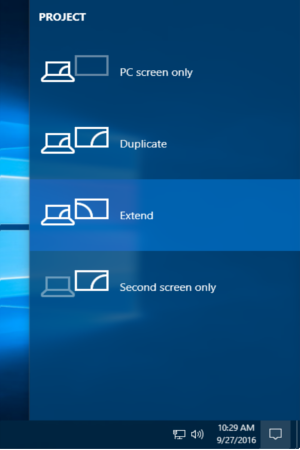 |
| Find the “Action Center” icon in the lower right taskbar, and click on the “Project” icon (left image). In the “Project” menu, out of the four options, choose how you want to display your monitors (right image) |
To further customize the expanded screen, right click on the desktop and select “Display Settings” to open the “Project” menu of the system.
From here the two screens’ position relative to each other, display size such as text (expansion rate), display orientation, the previous four display method settings, and the main / sub-display monitor settings can be changed. Additionally, if you cannot see your connected display, click on “detect” to try to find the display (if this doesn’t work we recommend reconnecting the cable and/or restarting your PC).
In the enclosed grey squares [1] and [2], the position of the two monitors relative to each other is displayed. It’s best to drag these two squares to suit the actual position of your monitors.
These days notebook PCs equipped with very high definition displays of pixel densities greater than full HD are growing, but when these units are connected to external displays the character and icon sizes can vary significantly between the original notebook PC and external monitor, making it difficult to work with. If that’s the case, the “Change the size of text, apps, and other items” slider bar can be used to effectively adjust the display sizes close to the each other.
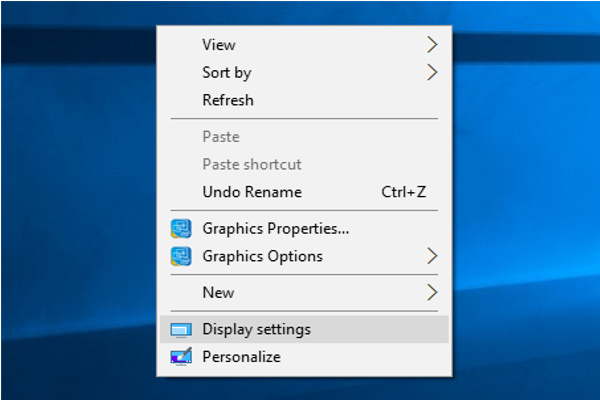 |
| When you right click on the desktop, select “Display settings.” |
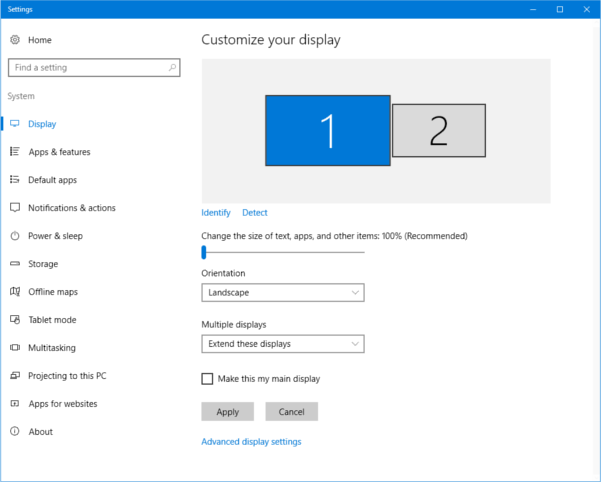 |
| In the “System > Display” menu the screen position, display size (enlargement ratio), display orientation, display method of the multi-display, and main/sub display can be set. |
If you scroll down to the bottom of the “Display” menu there is an “advanced display settings” link. If you click on this, you can set the resolutions of the display monitors. Additionally, if you click on the “Advanced sizing of text and other items” link, you can change the settings for more detailed things like the size of items and text.
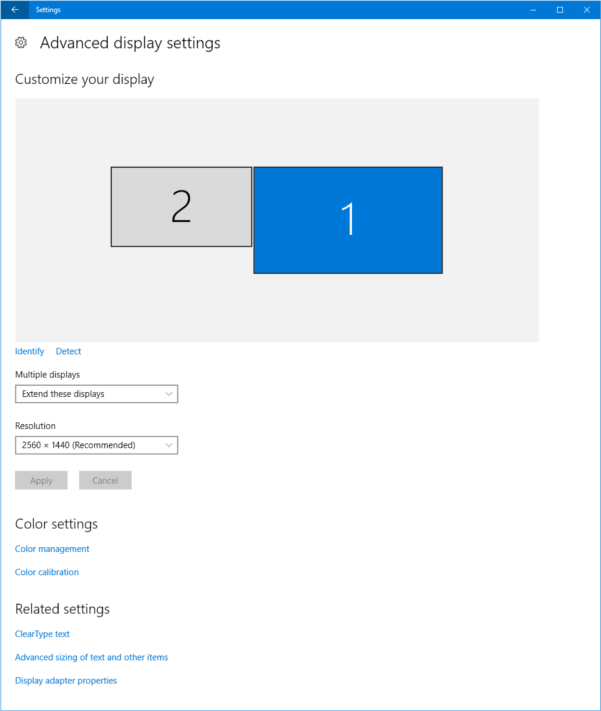 |
| In the “Advanced display settings” menu, you can set the resolution of the display |
As shown above, Windows 10 has a new settings application installed which we recommend you use. But you can also use the “control panel” found in Windows 8 and earlier. To any familiar PC user, the conventional method of using the control panel to display various settings is still possible.
The arrangement of Windows in Windows 10 is even easier to use
In Windows 10, the Snap Assist function that sticks the window to the edge of the screen is available, and even more convenient. If you drag the window to the left or right of the screen, the window will expand to fill half of the screen. This is also possible in the extended desktop function where two windows can be placed onto the left and right sides of each monitor, making a total of four open windows. This can also be accomplished with the shortcut keys Windows + left or right arrow.
After snapping the window to either the left or right using Snap Assist, the vacant area on the opposite side will list all other available windows that can be selected to fit that space. This is also a new feature of Windows 10.
 |
| In Windows 10, after a window has been snapped to either the left or right side using the snap function, the empty area in the opposite side will display all other available windows as thumbnails. Choose one of these windows and it will fill that side of the screen. |
Furthermore in Windows 10, if a window is moved to one of the four corners of the screen, it will shrink to 1/4 the size of the screen, so that four windows can be displayed at once. Additionally, in a multi-display environment, if you are displaying too many windows and your desktop has become messy, click and drag the window you want to view and quickly shake it to minimize all other windows. You can also press Windows and Home.
 |
| Using the half and 1/4 snap-function, the windows can be displayed like this without any gaps. |
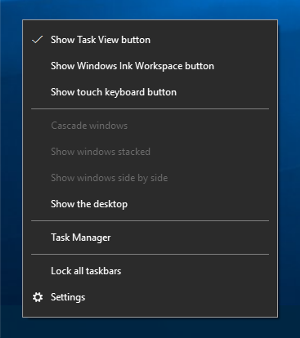
Making multi-display even easier with the taskbar
Let’s take a look at how the Taskbar can be used to increase the efficiency of the multi-display function. Right click on the taskbar and select “Settings” to display the “Settings > Taskbar” menu. Let’s look at the multi-display settings that can be found here. If you want to display the taskbar on your second device, slide the “Show taskbar on all displays” option to “on” and the taskbar will appear on both devices.
 |
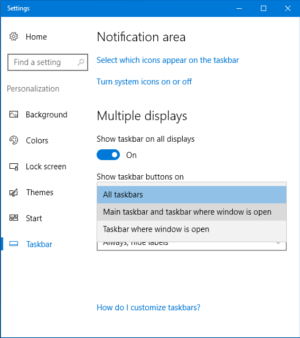 |
| Right click on the taskbar, and select “Settings” (Left image). In the “Settings > Taskbar” menu, scroll down to “Multiple displays” and you can choose how the taskbar will be displayed on each device. |
There are three options to choose how the taskbar can be viewed. The “All taskbars” option will display the taskbar the same on both displays, with all the running program icons displayed on both display’s taskbars. The “Main taskbar and taskbar where window is open” will display all running program’s icons on the first display’s taskbar and also display the programs running on the second display in the second display’s taskbar. Finally if you select “Taskbar where window is open” the taskbar will be displayed on both displays, but a running program’s taskbar icon will only be displayed on the taskbar of the monitor that the program is displayed on.
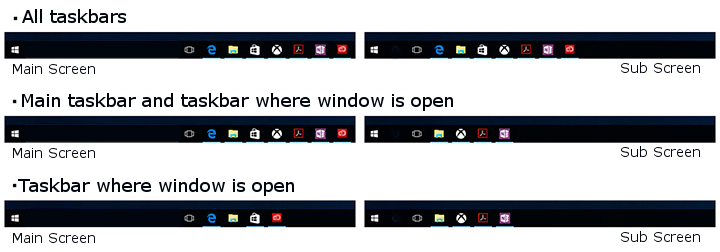 |
| The above image shows the difference between the “All taskbars,” “Main taskbar and taskbar where window is open,” and “Taskbar where window is open” settings. The Windows 10 voice-enabled personal assistant “Cortana,” time icons and the notification area will always display on the first monitor. |
Break through the limitations of a notebook PC by using an external display
If you connect an external display to a notebook PC, being able to create a large-screen, high resolution dual-display environment can significantly improve one’s work efficiency. These days products with high density pixel displays larger than full HD are becoming more common, but if a notebook PC with a screen size of 13 or 14 inches is displayed on one of these high resolution displays, the screen will end up shrinking so that it’s difficult to read, and so it has to be enlarged by 150% or 200%. Therefore it’s not that resolution = workspace, but rather that your workspace is limited to the size of your screen.
But an external display with a mainstream 23 – 24" full HD (1920 x 1080 pixels) or WUXGA (1920 x 1200 pixels) model, connected to a notebook PC, will display in a similar size to the notebook PC making it familiar to the user, and providing a lot of work space.
For example you could do things like compare multiple pages at once in a web browser; create a graph on a spreadsheet and paste it into a presentation while reading a PDF document; do work on one screen and watch videos or view a social media timeline on the other; play a game on one screen while reading a walk-through on the other, or use an external color management monitor to check for correct colors. Using an external monitor in addition to your notebook PC allows all of these things to be done seamlessly without having to switch between windows.
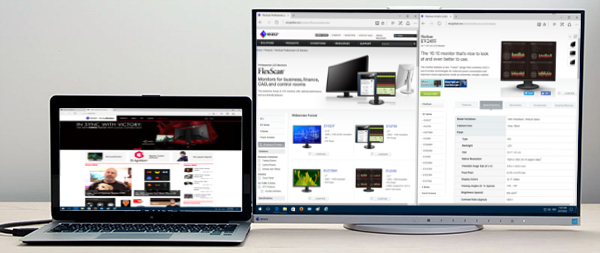 |
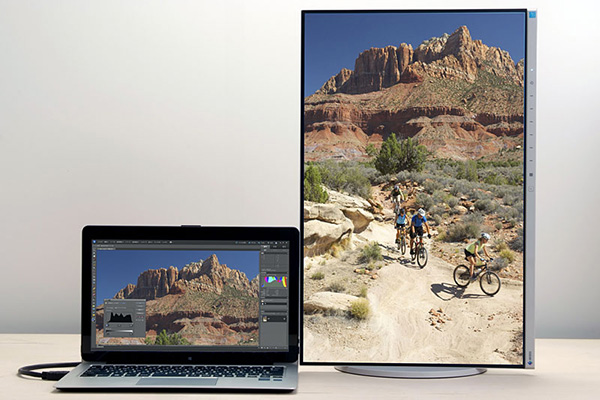
| Example: An EIZO 24.1 inch WUXGA display (FlexScan EV2455) connected to a high-spec 2in1 VAIO Z notebook PC (from here on the examples will display the same set-up). The VAIO Z notebook display has a high definition resolution of 2560 x 1440 pixels, but because the screen is only a “mobile” 13.3 inches, on Windows it is expanded to 200%. Adding this to the FlexScan EV2455’s 24.1 inch 1920 x 1200 pixel display, gives a vast area of work space. Of course, because the FlexScan EV2455 has a large screen and 1920 x 1200 pixels, the notebook’s display can be displayed at 100% without needing to increase the 1920 x 1200 pixels. This makes for comfortable browsing of multiple web pages as shown. |
 |
| Example: On a large external display, you can watch an online video while searching for relevant information on your notebook. Of course you can surf the internet on anything, but the large external screen is perfect for enjoying video content. |
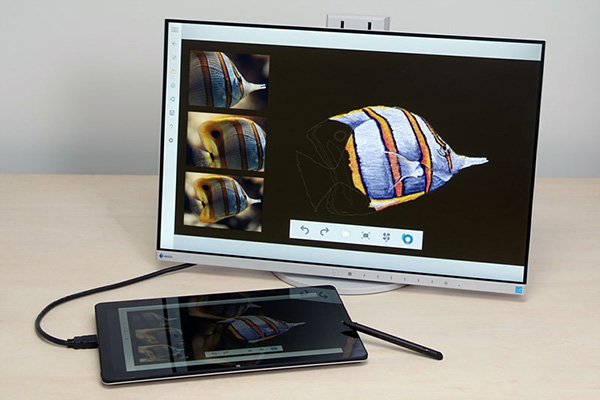 |
| If you have an external monitor with excellent color display, you can use the graphics software in your notebook PC whilst replicating (mirroring) the display onto the external monitor; creating color-accurate images while you work. The above image is an example of the “Fresh Paint” application. |
A word of advice when choosing a monitor to connect to your notebook PC, in a dual display environment — having the two taskbars at the bottom of the screen be uniform makes it easier to use, but a notebook PC’s height cannot be adjusted, so choosing a product that can be easily adjusted is desirable. Furthermore, because a notebook’s display is situated at a fairly low height, an external monitor that can be lowered to the table surface is better.
On the other hand, if you have an external monitor that can be raised quite high, it can be situated on top of the notebook – achieving an extended workspace on a narrow desk. Additionally, if you have an external monitor that is capable of rotating to a vertical (portrait) position, you can take advantage of the long screen by using it for web pages, SNS timelines, and reading documents.
 |
| If an LCD display’s height adjustment range is wide, you can create a vertical multi-display environment like this, reducing the required width of your working space. The image gives the example of a VAIO Z and FlexScan EV2455, but if you tilt the screen of the VAIO Z, the FlexScan EV2455 can be made to not overlap as shown; naturally creating two screens. |
 |
| If the external display is set in the vertical position, portrait photos and long lists of information can be displayed. The notebook PC cannot be used in the vertical position. |
In our examples we used the EIZO 24.1-inch WUXGA display FlexScan EV2455 because it is a monitor with a height adjustment range of 131 mm and the ability to be vertically rotated, so it can be easily combined with a notebook PC. Additionally, because of the narrow “frameless” design, the black border and bezel (i.e. noise) is minimized as much as possible. It’s easy to appreciate how the visual transition from one screen to the other becomes naturally gentler on the eyes. This monitor will also suit any photo-retouching and content creation by correctly displaying the sRGB color gamut; i.e. displaying colors the same as those found in most notebook PCs.
It should be noted that in Windows 10, the “tablet mode” cannot be used in a multi-display environment. In Windows 8/8.1 a notebook PC could display the modern UI start screen while an external display could display the desktop UI, but in Windows 10 the multi-display environment is restricted to only using the desktop UI. This is one of the revived functions that were found to be most useful in Windows 7.
Using the multi-display environment with a desktop PC
Although the notebook PC has become mainstream in recent years, the desktop PC is still popular for users who require high-performance or work efficient computers. So to these users who want to take advantage of their high-powered PCs and increase their productivity, we recommend the multi-display environment. Using large, high resolution displays in a multi-display environment gives you an unbeatable advantage.
Because there are no screen size or resolution restrictions like in a notebook PC, the desktop multi-display environment can use a flexible combination of screen sizes and resolutions according to your location, budget or application. If so inclined, using the previous EIZO monitor, a resolution of 5760 x 1080 pixels could be made from 3 monitors, 5760 x 2160 pixels from 6 monitors, and many more variations can be made.
Of course even a non-high-spec environment can find improvement in their work efficiency by using two mainstream 23 – 24 inch Full HD (1920 x 1080 pixels)/WUXGA (1920 x 1200 pixels) monitors, compared to just the one monitor.
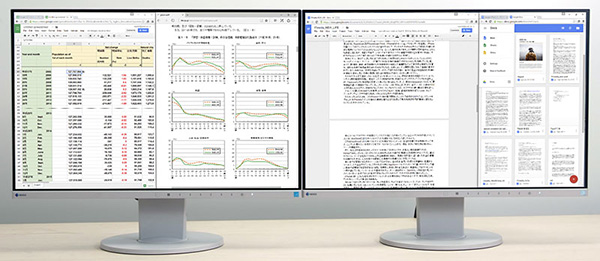 |
| An example of how a multi-display environment can be used in the business scene. The left display can display tables and calculations of statistical data, while comparing the graphs, and the right screen can be used to summarize the findings in a document. If this were just one monitor, you would be constantly switching between windows, but with two monitors you can see all the necessary data without needing to switch between windows; improving work efficiency and reducing transcribing errors. |
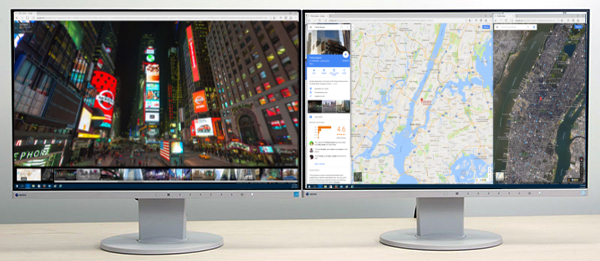 |
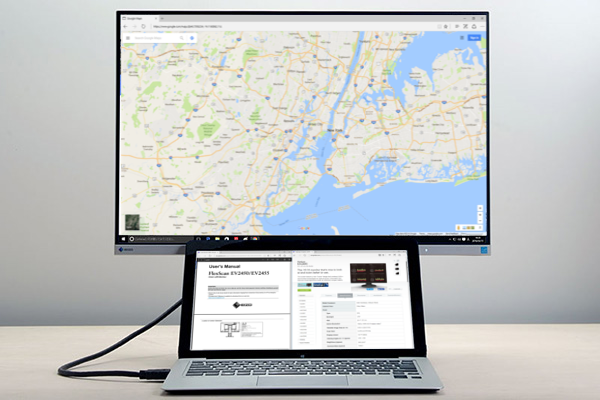
| An example of how map-based services can be used. On just one screen, the display range of a map is quite narrow, but with two screens, a map, aerial photo, information about the location, and photos from the location can all be displayed at the same time. You can take advantage of the realism of the large screen by doing virtual tours of tourist destinations. |
 |
| An example of how the multi-display environment can help with photo re-touching. Rotating one monitor to the vertical position can help with retouching portrait photos, or editing long documents and websites. If you want to take advantage of a vertical screen, you need to choose a monitor that can be rotated or buy a separate rotating mount to attach your monitor to. |
Most commonly when people want to build a multi-display environment, they start with one monitor, and then later add another one. Ideally, it’s best to purchase multiple monitors of the same model in the beginning. This way the screen size and resolution can be aligned, but also the color and aesthetics will match. But perhaps more importantly, because the monitors are the same age, any defects in the screen such as color variations can be found early-on by comparing the two monitors next to each other.
Another note for those who might be thinking about trying to build a multi-display environment, is that the more monitors you align, the wider your viewing angle will need to be. In order to be able to see each monitor clearly without having to move, you need to buy a product that has wide viewing angles. Furthermore, the more screens you have the harder it is to avoid light reflecting on your screen and into your eyes. To prevent this, we recommend buying a monitor with a glare reducing surface, which will make the screens easier to see and will be easier on your eyes. Additionally, as mentioned above we recommend a monitor with a narrow bezel and black border as it is space-saving and increases visibility among other advantages.
The 24.1-inch WUXGA display FlexScan EV2455 that we used, uses an IPS LCD panel with wide viewing angles and a glare reducing screen. Furthermore it has a narrow-frame design of only 6.2 mm (1 mm bezel and 5.2 mm black border). Therefore two monitors side by side will only have a gap of 12.4 mm, so you can make an almost noiseless multi-display environment. Another feature is the automatic dimming function (Auto EcoView) which leads to less eye fatigue, and less power consumption.
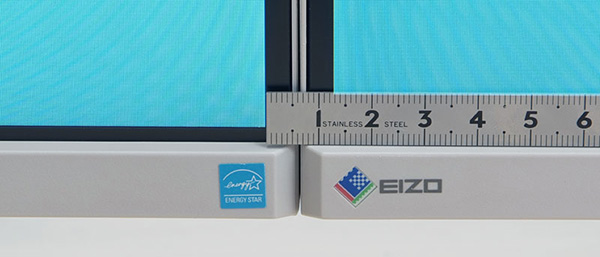 |
| The FlexScan EV2455 has a narrow frame design of only 6.2 mm (1 mm bezel and 5.2 mm black border). This requires only 12.4 mm when two monitors are aligned, so the bezel doesn’t feel like it’s in the way. |
Finding the best value product for multi-display use
Earlier we introduced the set-up procedure for Windows 10 “multi-display,” and also showed some concrete examples. Whether you use a notebook PC or the more conventional desktop PC, if you want to increase the work efficiency of Windows 10, using multi-display is highly effective.
Some important things to consider when choosing a product is of course the image quality, but also wide viewing angles, glare reducing specifications, a narrow bezel that is easy to see past, a stand mechanism that allows for a wide range of installation locations, functions to prevent eye fatigue and power saving measures.
Even compared to a PC, a monitor is still a possible long-term investment. Therefore we recommend that you do not compromise on quality; in the medium to long term if you think of the comprehensive savings made through increased work productivity, reduced burdens on your body, and reduced power consumption, high-quality display products may offer higher value. Considering that, the FlexScan EV2455 that we used from EIZO’s “FlexScan EV” series meets all of these elements and includes a 5 year warranty, making it one of the best products suited to a multi-display environment.
Windows 10 Creators Update
Windows recently released the free Windows 10 ‘Creators Update’ (version number 1703). With this update come a few new and changed features, not mentioned in this article. Read the following article to find out about some of the changes relating to monitor settings and how to use them.
Changes in the Windows 10 Creators Update
Recommended Models
|
USB Type-C for daisy chaining and
 |
USB Type-C connectivity
|
Frameless and compact for saving
|